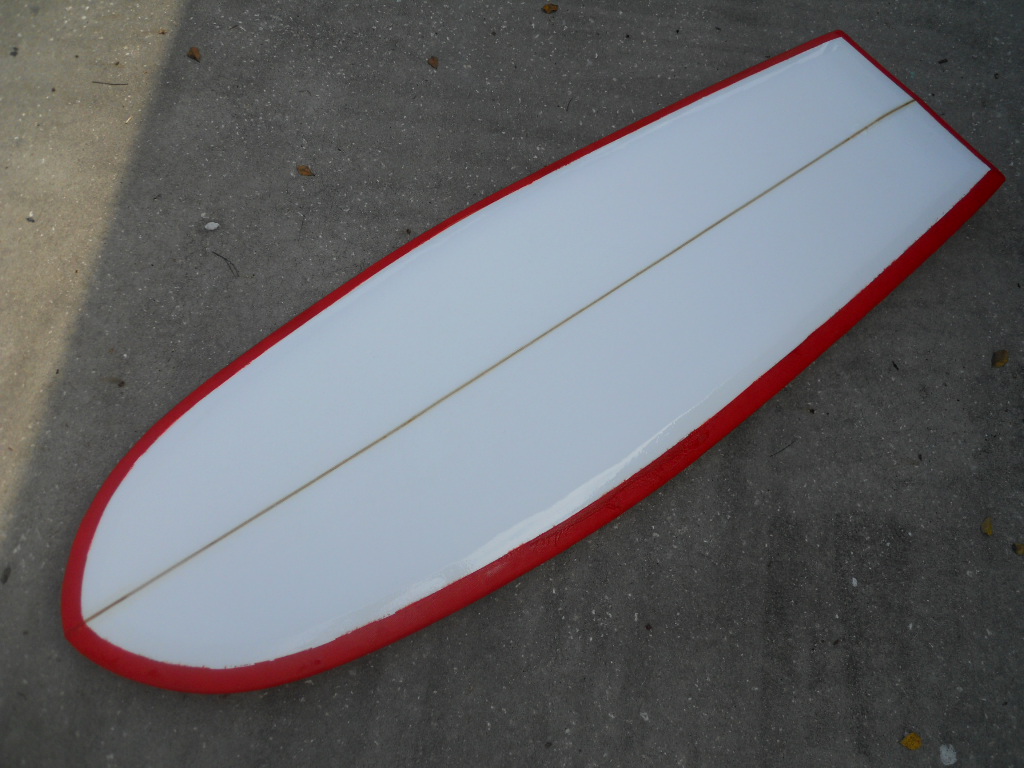
I've been slowly working on this one over the past couple of months. It is a retro single fin with step deck, beaked nose, flat bottom and tail vee. Here are some pics of the bottom laminate coat. I used 6oz Volan cloth and red, yellow and white opaques to accent the orange tint.
Saturday, December 7, 2013
Tuesday, November 19, 2013
5'11" Scorpion Finished!
Here are some pics of the 5'11" x 19" x 22 3/8" x 15 3/4" x 3" Scorpion that just got finished. I got the idea for this design from seeing a guy riding a Donald Takayama Scorpion. I tried to mesh that board's concept with the strenghts of the mini-simmons to create a short, floaty, small to mid-size wave board that can handle steeper wave faces and make tighter turns. Ride report to follow...
Wednesday, November 6, 2013
Shaping sessions at Surf Source
Jared Battani and I just spend a couple lunch breaks renting the shaping bay at Surf Source in Atlantic Beach. We are working on a 7'2" mini-mal for him and a 6'6" retro single fin shortboard for me. Here are some pics of the session...
Wednesday, January 30, 2013
Pelican Noserider post-hot coats
This board came out great...definitely my best work. Super clean cutlaps and lines throughout and seamless transitions between layers of glass. The resin art is a little crazier than what I had in my head, but you never know unless you try!!!
Thursday, January 17, 2013
10'0" x 19" x 23.75" x 16" x 3.25" Noserider
Here are some pics of the bottom laminate coat of the new noserider longboard. The bottom features a 1/4" deep nose concave that runs the 1st 1/3 of the board, transitions to a flat mid-section with 60/40 rails, and then the last 1/3 has tail vee and deeper tucked rails. The tail also is reinforced with a second layer of 6oz glass to bear the strain on the single fin. Also, I used orange resin tint paste, yellow opaque, and green resin tint for the resin art.
Sunday, January 6, 2013
6'8" Freebird Model Shortboard complete!
Here are pics of the finished product! It measures 6'8" x 12.5" x 20.5" x 15.5" x 2.75", features a single to double concave with tail vee, and a five fin setup. The deck is 6oz + 6oz patch and the bottom is 6oz with 4oz fin patches. The EPS blank is the 6'9"A rocker profile with 2.0# density foam with a 3/16" marine ply stringer.
Five fin option
Carbon fiber rails on tail
Side by side comparison with a CI 6'6" Whip model
Tuesday, January 1, 2013
6'8" Freebrid Model Shortboard update
All that is left is sanding now! Sanding is my least favorite part of the process, but definitely the most rewarding when finished. Here are a few pics taken prior to the bottom hot coat kicking.
5'10" x 16" x 21 1/2" x 16 3/4" x 2 11/16" Quad Fish Compete!
Here are some pics of the board taken at Mickler's Landing Beach in Ponte Vedra Beach. The board measures 5'10" x 16" x 21.5" x 16.75" x 2.69" and sports S3 fronts and GX rears. The bottom has one layer of 6oz glass with 4oz fin patches and I used a pink, white, clear and tiny bit of red as a resin swirl combo. The deck has one full layer of 6oz glass with a 6oz deck patch and both sides were wetsanded to 320. Adam and Julia came over before glassing to sign the deck for Christiana.
Friday, December 14, 2012
5'6" Mini-Simmons w/ West Coast Hercs Logo
Justin flew to Jax from Ventura and picked up his mini-simmons today. We scored a chilly and windy session at Blue Tops on Mayport and he was tearing it up. I knew he liked the board when after a few rides he said that he wants to order a quad fish too. Here are a couple pics of the finished product. I look forward to hearing how it rides out at C-Street!
I couldn't resist the photo op!
Sunday, December 9, 2012
6'8" x 12.5" x 20.5" x 15.5" x 2.75" Shortboard
I've slowly been working on a new shortboard over the past couple of months. It is inspired by two "magic" boards that I've ridden in the past; a 6'10" Costa Azul that I rented in Cabo and a 6'6" CI Whip. This board is 6'8" x 12.5" x 20.5" x 15.5" x 2.75" with a single concave starting at ~12" and transitioning to a double concave at midpoint and extending to the trailer fin with vee off the tail. I took a lot of time and experimenting on other boards to get the concaves and fin positioning right. The concaves begin right after the rails tuck, so I had to use 9 degree cant FCS fusion plugs for the uppers and 5 degree cant for the rears. Also, I stuck pretty close to the McKee fin positioning doctrine to provide maximum speed and reliability. Here is how it looks so far...
Just prior to installing fin plugs
Wednesday, November 28, 2012
Happy Birthday Christiana! - 5'10" Quad Fish
Christiana,
Happy Birthday from your mom and dad! Here is a picture of your brand new 5'10" quad fish!
It is made of 2# density EPS foam and has been completely shaped, sealed, and sanded. Next, will be installing the FCS fusion plugs and glassing. I'll continue to update the blog with current photos of the progress. It should be ready by mid-December!
12/9/2012 Update:
Bottom laminate coat - pink & white resin swirl
Clean cutlap on deck
Monday, October 8, 2012
Quad Fish complete!
This board came out great! It is sanded down to 320 wet and is very light. It should fly!
FCS M3 fronts & GX rears wood replica fins
Friday, September 21, 2012
Mini-Sims progress report
I got Justin's deck laminate coat glassed on Thursday afternoon and did a separate patch lamination today for the "West Coast Hercs" patch and my logo. His lamination came out really nice. Next is a light sanding, grinding off the FCS plug covers, leash plug install, hot coats, and final sanding.
2 layers of 6oz cloth ready for lamination
laminating completed.
Thursday, September 20, 2012
10'0" Longboard Blank & Wood Tail Block
Next board up will be a 10'0" longboard. I went by the Holladay Surfboards factory and John Holladay, Clay Bennett, and I decided to use the Clark Foam 10'4" template on an existing 10'0" SUP blank to build a good nose rider. John is experimenting with colored glues, so I had him use black pigment on the blank. We decided to cutout a crescent on the deck/rails and glue it up to give it a triple stringer look like a classic looking WRV that I rode for years.
I'm also toying with the idea of adding a tail block to the longboard. I glued two pieces of red oak with a thin piece of marine plywood for a simple design. Below are pics of the raw blank and tail block.
Saturday, September 15, 2012
Glassing updates for Quad Fish
Serena decided to go for a tie dye blue & white resin swirl pattern for her deck. I used white opaque, light blue opaque, and blue tint for the pattern colors. I made the pattern radiate from a central white spot where the logo goes. The inlay was cut with a razor just before curing to leave a clean transition line that mirrors the curvature of the rail. Here are some pics of the process:
Saturday, September 8, 2012
Glassing updates for Quad Fish & Mini Simmons
Here is Serena's quad fish bottom laminate coat after cutlap on the deck. I used resin opaque to get uniform coloring. It looked lime green when I mixed the colors; however, once spread on the board the resin looks a bit darker...maybe a grass green. Colors usually get muted by the hot coat after sanding, so we'll see what the end product looks like soon! I'm going to glass the logos separately so that the resin coloring doesn't drown them out. It is all coming together now....
Bottom after glassing logo separately
Subscribe to:
Posts (Atom)